
ERC2202-W WiFi dual smart light controller
1 Product Description
1.1 Product Introduction
Ebelong ERC2202 series dual smart light controller supports WiFi and RF, which can be controlled by Tuya App and wireless kinetic switch. It reserves the input terminals for traditional switches, and can control the light by the original traditional switches. It is mounted in the box of switch/socket (European standard box), light panel, etc. It supports dual channels, maximum current for each channel can reach 5A. Through the smart speaker, it can achieve ON/OFF by voice control. (Smart speakers like Google Assistant, Amazon Alex).
1.2 Product Image


2 Technical Parameters

3 Wiring Diagram
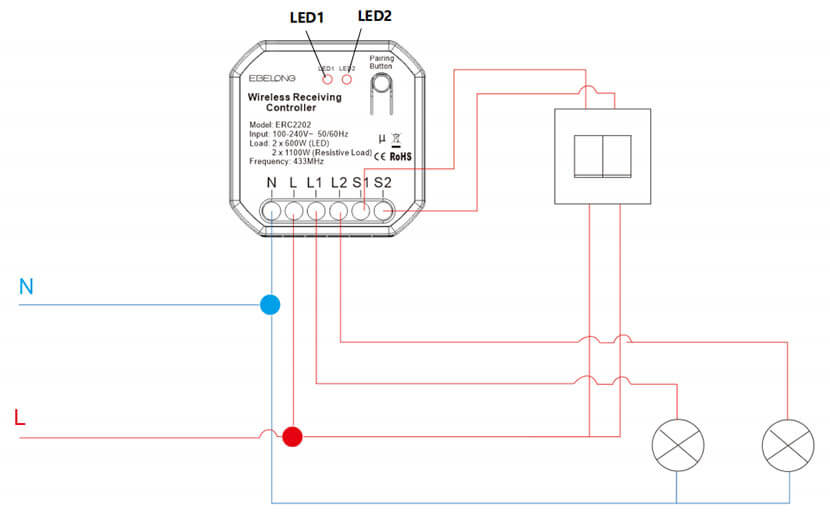
L: Input Live Cable
N: Common Neutral Cable
S1/S2: Input Terminal for Traditional Switch, compatible with rocker switch and push botton(detect switch type automatically)
L1/L2: Output Live Cable, connect to lights
4 Product Features
4.1 Network Method
After the Receiver is powered on, it enters the network configuration (EZ mode) by default, and the LED1 light flashes quickly (2 flashes per second). If LED1 light is not in right state, need to reset the device to enter the network configuration mode, follow the steps below: Press the button for 10 seconds, then release the button after the light is still, and when the LED1 light is flashing quickly, it means that it enter the network configuration state. After entering the network configuration mode, it can add devices through the App of “Tuya Smart” or ” Kinetic Switch”. After the device is successfully added, it can achieve ON/OFF by App control.
If the controller network cannot be configured successfully in “EZ mode”, try “AP mode”. Follow the steps to switch to the “AP mode”: press the button for 10 seconds in “EZ mode”(When LED1 light flash qucikly), then release the button after the light is still, and it can switch to “AP mode”. At this time, the light will turn off once every 2 seconds. If need to switch it from “AP mode” back to “EZ mode”, press the button for 10 seconds, then release the button after the light is still.
4.2 The pairing method for wireless kinetic switch
There are two pairing methods for pairing with the receiver and the wireless kinetic switch:
Ordinary pairing and Directional pairing.
4.2.1 Ordinary Pairing
4.2.1.1 App Method
Enter the App page, click “Pairing” -> “Start Pairing”, and select the corresponding channel. After the App page displays “waiting for pairing”, press the corresponding button of the wireless kinetic switch that needs to be paired. It can complete the pairing. (the App will prompt “Pairing succeeded” after the pairing is completed.)
4.2.1.2 Physical button Mode
Press the button for 3 seconds, the light will enter a slow flashing state (1 flash in 1 second is a slow flash. LED1 indicates L1 output, LED2 indicates L2 output, double-click the button to switch the channel), the receiver enters the status of “waiting for pairing”. At this time, press the button of the wireless switch that needs to be paired once, and the light is off, it means that the pairing is completed.
4.2.1.3 Through wired switch
Within 2 minutes after the controller is powered on, press the wired switch corresponding to the lamp for 5 times(Within 2 seconds), and the load lamp will start flashing, that is, the controller enters the pairing mode. At this time, press the wireless switch once, and the load lamp will stop flashing, which means that the pairing is completed. After controller is powered on more than 2 minutes, the pair mode cannot be triggered by the wired switch.
4.2.2 Directional Pairing
In order to meet the user’s habit of using traditional switches, and to ensure the synchronization of the states of multiple wireless receiver in one control and multiple modes, the directional pairing is defined. This pairing method only supports double-buttons or six-buttons rebound switches. The pairing methods are as follows:
4.2.2.1 App Method
Enter App page, click “Pairing” -> “Start Pairing”, select the corresponding channel, after the App page displays ”waiting for pairing”, quickly press any button of the wireless kinetic switch for 4 times within 1 second (the left and right buttons of the rebound switch are a group) to complete the pairing. (App page will prompt “pairing successful” after the pairing is completed).
4.2.2.2 Physical button Mode
Press the button for 3 seconds, the light will flash slowly, the receiver enters the state of “waiting for pairing“. At this time, press any button of the wireless kinetic switch for 4 times (within 1 second), and the light will turn off, it means that the pairing is completed.
Note: After the pairing is successful, the left and right buttons of the rebound switch are a group, short press the left button is to close, and short press the right button is to open.
4.2.2.3 Through wired switch
Within 2 minutes after the controller is powered on, press the wired switch corresponding to the lamp for 5 times(Within 2 seconds), and the load lamp will start flashing, that is, the controller enters the pairing mode. At this time, press the wireless switch 4 times(within 1 second), and the load lamp will stop flashing, which means that the pairing is completed. After controller is powered on more than 2 minutes, the pair mode cannot be triggered by the wired switch.
4.3 Cancel pairing with wireless kinetic switch
4.3.1 App Method
Enter the App page, click “Pairing” -> “Clear Pairing”, and select the corresponding channel. After the clearing is completed, the app will prompt “Clearing Successful”.
4.3.2 Physical button Mode
Press the corresponding button of receiver for 12 seconds, the light will flash-still-off, and then release the button, all information for the wireless kinetic switch that matched with this channel will be cleared.
4.4 Clear Network
4.4.1 App Method
Enter the app deviece page and select “Remove Device” to clear the device network configuration.
4.4.2 Physical button Mode
Press the button for 10 seconds, the light is flashing to still, and then release the button, LED1 will flash quickly, and the devices will be removed from the App.
4.4.3 Through wired switch(Only support push button)
Within 2 minutes after the controller is powered on, long press anyone wired switch for 15 seconds, and lamp state will be reversed, it means network information of controller is cleared (such as: long press the wired switch 15s, lamp will change from opened to closed, clear network is successful), can add controller through the app at this time. After the controller is powered on more than 2 mintues, the network information of controller cannot be cleared through the wired switch.
4.5 Bridge Mode
Press pairing button on the controller for 7 seconds. LED1 changes from blinking slowly to blinking quickly (blinking twice a second). When blinking quickly, release your hand and the controller enters bridge mode. To disable the bridge mode, repeat the preceding steps.
4.6 Wired switch control
The controller supports automatic detection of wired switch type (rocker switch or push botton) : After the controller is powered on, press the wired switch once to set the current wired switch type (for example, if the rocker switch is pressed after the controller is powered on, set the wired switch type to rocker switch). To reset the wired switch type, power off the controller and then power on it. Repeat the preceding steps.
5 Installation Diagram

6 Dimensions

This is the detailed specification of ERC2202-W WiFi dual smart light controller for reference.